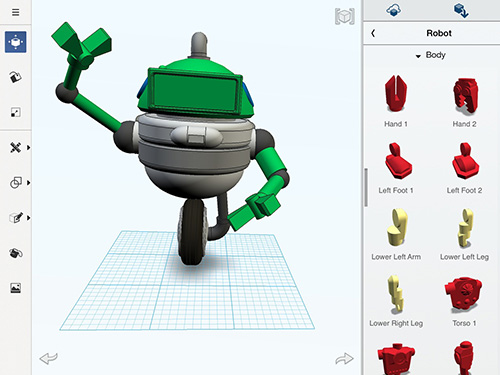
An overview of 123D Design for iPad.
123D Design, by Autodesk, is a consumer 3D design application that is designed specifically for iPad. The app is free and available on iTunes. The software allows you to choose and manipulate basic shapes to form 3D objects. Not only can you create your own designs, but you can share your designs with other through Autodesk's cloud.
Please note: this article is based on the 123D Design that was released on January of 2014.
123D Design gets a 4-star rating on iTunes. One user, The Organist, writes, "This 3D design is very simple and easy to get into. You get a basic slate of shapes and then have to use the tools to manipulate them into what you want. The interface is superb. This is not desktop software converted to an iOS. This app was designed to be used by the iPad."
We agree. 123D Design is simple enough for a child to use and a great way to introduce children to 3D design. Yet the program is robust enough to actually create some complex and practical objects. The touch screen of the iPad seems to lend itself very well to 3D design and we feel this is the direction things will go in the future
To start, we recommend downloading some 3D designs others have created. This is a great way to begin manipulating an object and discover how shapes are combined to create objects.
Autodesk has also created a number of tutorial videos that are available on YouTube. If you are new to 123D Design and/or 3D designing in general, we would recommend checking out these videos. There are many good tips and tricks you can learn and they also demonstrate how Autodesks' other apps interface with 123D Design.
The first time you open 123D Design, you are greeted with a three-screen tutorial which can be dismissed by clicking DONE in the top right corner. The tutorial explains:
- Getting Around – how to zoom in and out, and control the camera
- Power Tools – introduces the Design workspace
- Start Building – teaches how to assemble the "parts"
In the top left corner of the Design workspace is the control center of the app. From this menu you can:
- Sign in to your Autodesk.com account or create a new account
- Create a new design
- Save your work to the Cloud either privately, publicly, or to your camera roll on your iPad
- Print a 2D layout of your design (requires Premium account)
- Access your previously saved projects
- View preloaded examples of objects from airplanes to robots
- View the gallery where you will find designs that have been uploaded from other 123D Design users
The main workspace is where you create a new design. You begin by choosing parts that can be assembled. These parts can be found in the Cloud or from the right-hand drawer that can be pulled open when parts are needed or closed to free up the workspace. The Cloud has 17 categories such as Lighting Fixtures, Jewelry, Space Vehicles, and even Model Trains.
The pull out drawer offers parts in the following categories:
- Primitives — basic shapes such as cones and spheres or extended shapes such as a dome, tube, or wedge
- Glider — fuselage, stabilizers, and wings
- Hardware — brackets, hinges, pulleys, and anchors
- Car — body, wheels, windshields, etc.
- Houses — nails, slabs, railings, walls
- Robot — body parts
- Move — reposition the design
- Rotate — Views all sides of the part
- Scale — change size of the design
- Editing Tool #1
- Snap together two different parts
- Align 2 or more parts
- Display information such as overall measurements
- Editing Tools #2
- Combine two objects
- Subtract an object from the design
- Editing Tool #3
- Fillet (cut) an object
- Chamfer (mirror) an object
- Pull out a side of an object
- Hollow out a side of an object
- Paint Bucket — color the design
- Camera — take a photo of the design at any time in the design process
A Zoom tool can be found in the top-right corner of the workspace. Also Do and Undo are available by pressing the arrows in the bottom corners of the workspace.
If you have a FREE Autodesk account, you have unlimited public and private cloud space where you can save your designs. A FREE account also gives you non-commercial use of your designs, unlimited 3D model downloads from the gallery, community sharing, and the ability to download 10 premium models each month from the content library.
When your design is complete, and saved in the Cloud, you are ready to 3D print it. On your computer, sign in to your online account at apps.123dapp.com. In your account, click on "ME" in the top right-hand corner and choose Models. Find your design in your library and click on the gear in the top-left corner.
Note: The FIRST time you choose this command you will need to download the AutoDesk 123D Print Utility. Follow the detailed instructions to load this app to your computer. These instructions will include shutting down your browser, re-opening your browser, once again going to apps.123dapp.com, and entering your account.
Once you are in your account, go to Models and double click your project. Click on the large blue Edit/Download bar on the right side of the screen. Go to the bottom of the drop down menu and choose Download 3D Models. You will then have the option to download a STL file to your computer. This file can be printed on your home 3D printer or sent to a 3D printing service company such as WhiteClouds.